Apache's Solr is a powerful software package that allows you to develop your own search engine in no time. It's purely written in Java using Lucene at its core and can run inside any servlet container such as Tomcat (or Jetty). Eclipse is an IDE that makes developing Java applications incredibly easy because of its wealth of features such as code completion and refactoring capabilities not to mention the number of free plugins available to further make development easier. I find it much easier to keep everything contained in one place and being able to code, debug, and test inside of Eclipse makes developing my search engine much easier. This simple tutorial will show you how to setup Apache Solr to run inside Eclipse using a free third-party plugin that runs Jetty inside Eclipse.
You will need:
Step One: Basic SetupDownload and extract both Eclipse and Apache Solr tar files somewhere on your disk. Since Solr has some XML configuration files, I would also suggest installing the Eclipse WTP (Web Toolkit Platform) that gives you some good built-in XML editors.
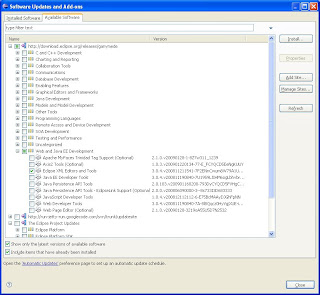
Follow the Getting Started guide in the RunJettyRun wiki to install the plugin. It should be pretty fast and easy.
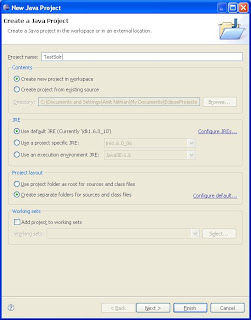
Step Two: Create your Java projectCreate a standard Java project in Eclipse (File..New..Java Project). Call it what you wish (I called it "TestSolr"). The default options should be fine and click through the wizard to see all the options or click Finish at your first chance to get done faster.
Here you should see your TestProject in your workspace with a blank src folder.
Step Three: Setup the Solr webapp in your Eclipse project.This is where the RunJettyRun plugin installed earlier gets used. This plugin allows you to develop, run and debug web applications inside Eclipse allowing you to take advantage of Eclipse's powerful code editing and debugging capabilities. It's also one of the simpler web application development plugins available. Eclipse supports full blown web development but for the purposes of this tutorial and developing needs, this plugin is more than enough.
- Inside the TestSolr directory, create a folder called "webapp". Do this by right clicking on the "TestSolr" in the workspace, select "New" and then "Folder".
- At a command prompt, unjar the apache-solr-1.4.0.war in this webapp folder. In Windows, this would be done by the following command:
jar -xvf c:\applications\apache-solr-1.4.0\dist\apache-solr-1.4.0.war
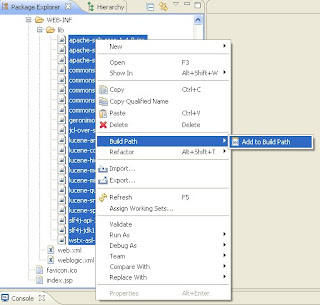
The contents of the war file should be in the webapp folder. To confirm, right click on the "TestSolr" folder in the Eclipse workspace and select "Refresh." - Add all the jar files in the webapp/WEB-INF/lib to the Build Path. This is done by selecting all the jars and right click on any of the jars (while all are selected), select the "Build Path" sub-menu and select "Add to Build Path"
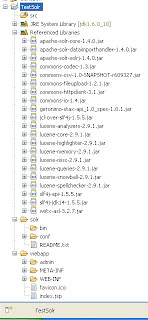
- Setup a solr home folder inside your project. For purposes of this tutorial, copy the "solr" folder from the "example/" folder in the directory containing solr into the "TestSolr" folder in your Eclipse workspace. By now, your "TestSolr" project layout should look something like this.
Step Four: Let's run this thing!Now that you have setup your project, it's time to create a run configuration for Jetty and run this!
- In Eclipse, go to the Run menu and select "Run Configurations...".
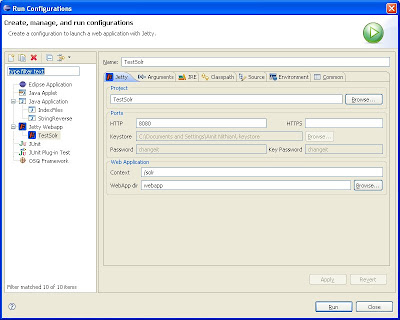
- On the left rail, you should see "Jetty Webapp" as one of the run configuration types. Right click on this and select "New". The project should be "TestSolr" (if not, type in TestSolr in the text box labeled with "Project"). The name of the run configuration is populated with "TestSolr" and can be whatever you wish.
- The default HTTP port is 8080 and can be left alone if you wish. To conform to Solr tutorials (making copying/pasting links easier, change this to 8983). Delete the HTTPs port 8443 since we aren't doing any SSL access. This will disable the SSL specific fields such as the keystore/password fields.
- Change the "context" to "/solr" from "/". This is more for conformity with the solr tutorials in that all links in the wiki you to something like http://localhost:8983/solr/.
- Type in "webapp" in the "WebApp dir" text box. This is the root of the web application and is the directory above the WEB-INF folder. This is where the solr war file was extracted and hence is the equivalent of deploying the solr war in your servlet container.
Your launch configuration should look like the following:
Now click the "Run" button which will save the changes and the console will hopefully start spewing out logs produced by both Jetty and Solr. Open a browser to
http://localhost:8080/solr/admin/ and voila! you should see the Solr admin page. In scrolling through the console, you shouldn't see any exceptions thrown.
This simple tutorial just shows the basics of setting up a simple solr installation inside Eclipse using Jetty and running inside Eclipse. Notice that we don't have any of our own code running that may do some extra things (say custom analyisis, tokenizing etc). If we did have such code, then it would naturally lie in the "src/" folder; however, we need to instruct Eclipse to compile the code so that it goes in the WEB-INF/classes folder so it will run inside Jetty. To do this:
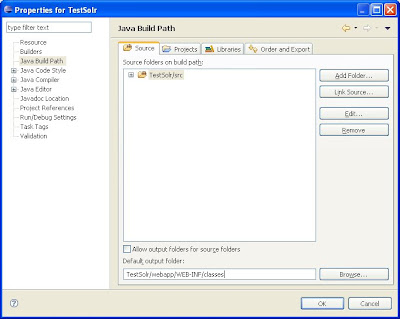
- Right click on the TestSolr project and select "Properties".
- Click on the "Java Build Path" on the left rail
- Click on the "Source" tab and towards the bottom, change the default output folder to be "TestSolr/webapp/WEB-INF/classes".
Now you can develop your custom solr plugins directly in Eclipse and debug them immediately. Instead of running the TestSolr jetty instance, you can launch it in debug mode by going to the Run Menu and opening the "Debug Configurations.." sub-menu, selecting the Jetty configuration created earlier and click the "Debug" button. I would encourage familiarizing yourself with Eclipse's debugging capabilities for they are vast and amazing.
If you have any questions or comments, please post them and I'll do my best to answer them as quickly as possible.


