Showing posts with label apache solr. Show all posts

Monday, September 26, 2011

Using JMX to modify the parameters of a running Solr instance

Apache's Solr is a great software package to build your company's search engine around because of it's active community, great contributions, and solid foundations with Lucene at its core. If you are new to this package, then check out my earlier post on setting up Solr with Eclipse http://hokiesuns.blogspot.com/2010/01/setting-up-apache-solr-in-eclipse.html .

Normally, a company using Solr to power it's search engine will have a front end written in a web framework such as Ruby on Rails that makes calls to Solr through it's REST interface. One example is Zvents.com (my employer), where our front end is RoR that makes multiple calls to Solr to power various portions of the site. One common problem we encountered at Zvents was that a particular search would yield weird results and we'd execute the query passing the "&debugQuery=true" flag to study why that result appeared where it did. Afterwards; however, came the hard part.. tuning the ranking functions and refreshing the page to see if the results look better. There are two ways to do this:
  1. Pass the modified set of ranking function parameters (bf, pf and/or qf) to Solr via the URL string
  2. Modify solrconfig.xml and restart Solr to see what the results look like.
While #1 is certainly better than #2, both have their problems for the following reasons:
  • Restarting Solr can be slow and is not scalable. Each change requires a restart and this may take several minutes just to see the changes. Also it forces the person doing the tuning (say the search scientist/expert) to be able to understand the operational side (i.e. where Solr resides, how to restart it etc). This may be problematic for some people who are a averse to dealing with such operational details.
  • While passing the ranking function parameters via the URL works, it makes the URL significantly longer (which is a personal annoyance that most browsers have single line URL boxes) and this doesn't allow you to see the results of your change in the UI built by your front end team (without a special interface or requiring someone from that team to make changes to the UI code).
At Zvents, our initial solution to this involved building a special UI hosted within the Solr web application context, a JSP page + corresponding servlet with text boxes for each major ranking function parameter (qf, pf, bf) per handler. Our search experts would access this page and make the necessary changes which, upon submission of the form, would update the respective Solr handler's in-memory configuration map and thus the changes could be viewed in the UI built by our front end team. This was a great solution and certainly works; however, when Solr introduced JMX, it made more sense that such functionality live inside an MBean that exposed the ability to change these parameters using JConsole or any other UI with similar functionality.

Solr 2306- Modify default solrconfig parameters via JMX

When Solr added JMX support, it was a great way for administrators to be able to use a well known set of tools to understand what is going on inside of the JVM running Solr. Not only can you use JConsole to understand what the VM is doing but also what is going on inside of Solr.

This patch extends the built-in JMX support to also allow the default parameters (exposed via the <lst name="defaults">) to be exposed as modifiable attributes. When these parameters are modified, the changes are immediately noticed upon the issued search query without requiring any core reloads. To use this patch, follow the steps below and post any questions/comments on this JIRA issue https://issues.apache.org/jira/browse/SOLR-2306.

Step One: Checkout Solr, apply patch and build
svn co http://svn.apache.org/repos/asf/lucene/dev/trunk solr_trunk
cd solr_trunk
patch -p0 < <PATH_TO_PATH>/tuning_patch2.patch
cd solr
ant dist
Step Two: Setup and run example Solr instance
cd example
cp ../dist/apache-solr-4.0-SNAPSHOT.war webapps/solr.war
java -jar start.jar
Step Three: Load sample data
cd exampledocs
./post.sh *.xml
Step Four: Launch jconsole!
jconsole


In JConsole, choose the "MBeans" tab and along the left side, expand "/solr", "browse/", "org.apache.solr.component.SearchHandler", "Attributes". From here, you can select an attribute and change it's value.

Step Five: Modify parameters

For purposes of demoing the functionality of this patch, let's modify the "fl" parameter which describes the default set of field values to return. This can be overridden by passing &fl= on the URL; however, let's modify this parameter via JConsole to see it's effect. First though, let's look at some data by accessing http://localhost:8983/solr/browse
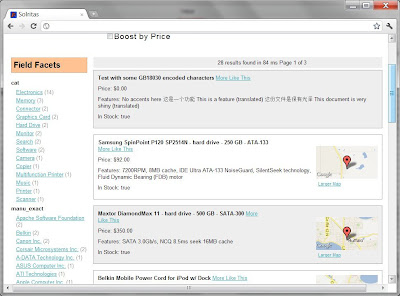


Notice that there is at least a name, price, and in-stock fields displayed. Using JConsole (make sure you followed the previous step), select the "fl" attribute and change it's value to only show "score,name"


and refresh your web browser pointing at the browse handler.


Notice that only the name is displayed along the top with the other fields that were initially present no longer there! Try this for other parameters and if you have JConsole pointing at your own search engine, try modifying the qf, pf, and bf parameters to see their effects. Of course keep in mind that to persist the parameter changes, make the appropriate changes in your solrconfig.xml file.

Conclusion

Through a fairly simple, contrived demo using the examples provided in the standard Solr distribution, you were able to change some default handler parameters for a particular search handler and immediately see its effects. Solr's JMX extensions provide a great way to peek inside of a running Solr instance without any major performance impacts. This patch takes this one step further and allows for real-time tuning of a running Solr instance. If you like this patch, and have login credentials on Apache's JIRA, please vote this up to help ensure that it gets rolled into a future release of Solr!

Saturday, January 2, 2010

Setting up Apache Solr in Eclipse

Apache's Solr is a powerful software package that allows you to develop your own search engine in no time. It's purely written in Java using Lucene at its core and can run inside any servlet container such as Tomcat (or Jetty). Eclipse is an IDE that makes developing Java applications incredibly easy because of its wealth of features such as code completion and refactoring capabilities not to mention the number of free plugins available to further make development easier. I find it much easier to keep everything contained in one place and being able to code, debug, and test inside of Eclipse makes developing my search engine much easier. This simple tutorial will show you how to setup Apache Solr to run inside Eclipse using a free third-party plugin that runs Jetty inside Eclipse.

You will need:
Step One: Basic Setup

Download and extract both Eclipse and Apache Solr tar files somewhere on your disk. Since Solr has some XML configuration files, I would also suggest installing the Eclipse WTP (Web Toolkit Platform) that gives you some good built-in XML editors.


Follow the Getting Started guide in the RunJettyRun wiki to install the plugin. It should be pretty fast and easy.

Step Two: Create your Java project

Create a standard Java project in Eclipse (File..New..Java Project). Call it what you wish (I called it "TestSolr"). The default options should be fine and click through the wizard to see all the options or click Finish at your first chance to get done faster.


Here you should see your TestProject in your workspace with a blank src folder.

Step Three: Setup the Solr webapp in your Eclipse project.

This is where the RunJettyRun plugin installed earlier gets used. This plugin allows you to develop, run and debug web applications inside Eclipse allowing you to take advantage of Eclipse's powerful code editing and debugging capabilities. It's also one of the simpler web application development plugins available. Eclipse supports full blown web development but for the purposes of this tutorial and developing needs, this plugin is more than enough.
  • Inside the TestSolr directory, create a folder called "webapp". Do this by right clicking on the "TestSolr" in the workspace, select "New" and then "Folder".
  • At a command prompt, unjar the apache-solr-1.4.0.war in this webapp folder. In Windows, this would be done by the following command:
    jar -xvf c:\applications\apache-solr-1.4.0\dist\apache-solr-1.4.0.war
    The contents of the war file should be in the webapp folder. To confirm, right click on the "TestSolr" folder in the Eclipse workspace and select "Refresh."
  • Add all the jar files in the webapp/WEB-INF/lib to the Build Path. This is done by selecting all the jars and right click on any of the jars (while all are selected), select the "Build Path" sub-menu and select "Add to Build Path"
  • Setup a solr home folder inside your project. For purposes of this tutorial, copy the "solr" folder from the "example/" folder in the directory containing solr into the "TestSolr" folder in your Eclipse workspace. By now, your "TestSolr" project layout should look something like this.

Step Four: Let's run this thing!

Now that you have setup your project, it's time to create a run configuration for Jetty and run this!
  • In Eclipse, go to the Run menu and select "Run Configurations...".
  • On the left rail, you should see "Jetty Webapp" as one of the run configuration types. Right click on this and select "New". The project should be "TestSolr" (if not, type in TestSolr in the text box labeled with "Project"). The name of the run configuration is populated with "TestSolr" and can be whatever you wish.
  • The default HTTP port is 8080 and can be left alone if you wish. To conform to Solr tutorials (making copying/pasting links easier, change this to 8983). Delete the HTTPs port 8443 since we aren't doing any SSL access. This will disable the SSL specific fields such as the keystore/password fields.
  • Change the "context" to "/solr" from "/". This is more for conformity with the solr tutorials in that all links in the wiki you to something like http://localhost:8983/solr/.
  • Type in "webapp" in the "WebApp dir" text box. This is the root of the web application and is the directory above the WEB-INF folder. This is where the solr war file was extracted and hence is the equivalent of deploying the solr war in your servlet container.
Your launch configuration should look like the following:


Now click the "Run" button which will save the changes and the console will hopefully start spewing out logs produced by both Jetty and Solr. Open a browser to http://localhost:8080/solr/admin/ and voila! you should see the Solr admin page. In scrolling through the console, you shouldn't see any exceptions thrown.

This simple tutorial just shows the basics of setting up a simple solr installation inside Eclipse using Jetty and running inside Eclipse. Notice that we don't have any of our own code running that may do some extra things (say custom analyisis, tokenizing etc). If we did have such code, then it would naturally lie in the "src/" folder; however, we need to instruct Eclipse to compile the code so that it goes in the WEB-INF/classes folder so it will run inside Jetty. To do this:
  • Right click on the TestSolr project and select "Properties".
  • Click on the "Java Build Path" on the left rail
  • Click on the "Source" tab and towards the bottom, change the default output folder to be "TestSolr/webapp/WEB-INF/classes".


Now you can develop your custom solr plugins directly in Eclipse and debug them immediately. Instead of running the TestSolr jetty instance, you can launch it in debug mode by going to the Run Menu and opening the "Debug Configurations.." sub-menu, selecting the Jetty configuration created earlier and click the "Debug" button. I would encourage familiarizing yourself with Eclipse's debugging capabilities for they are vast and amazing.

If you have any questions or comments, please post them and I'll do my best to answer them as quickly as possible.